
Carrier Mini Split Remote Control Manual: A Comprehensive Guide
Discover effortless climate control with your Carrier mini-split! This manual details remote operation‚ pairing‚ troubleshooting‚ and universal code compatibility for optimal performance.
Understanding Your Remote Control
Your Carrier mini-split remote is the central hub for managing your indoor climate. Before operation‚ familiarize yourself with its layout and functions – detailed on pages 6 through 10 of supplemental materials. This wireless remote control offers convenient‚ long-distance control of your air conditioner. It’s designed for intuitive use‚ allowing you to adjust settings without directly accessing the indoor unit.
The remote utilizes infrared technology to communicate with the indoor unit‚ so a clear line of sight is crucial for reliable operation. Avoid obstructions and direct sunlight on the receiver. Understanding the remote’s capabilities‚ including advanced features like timer settings and swing functions‚ will maximize your comfort and energy efficiency. Proper care‚ such as cleaning and protecting it from damage‚ ensures longevity.
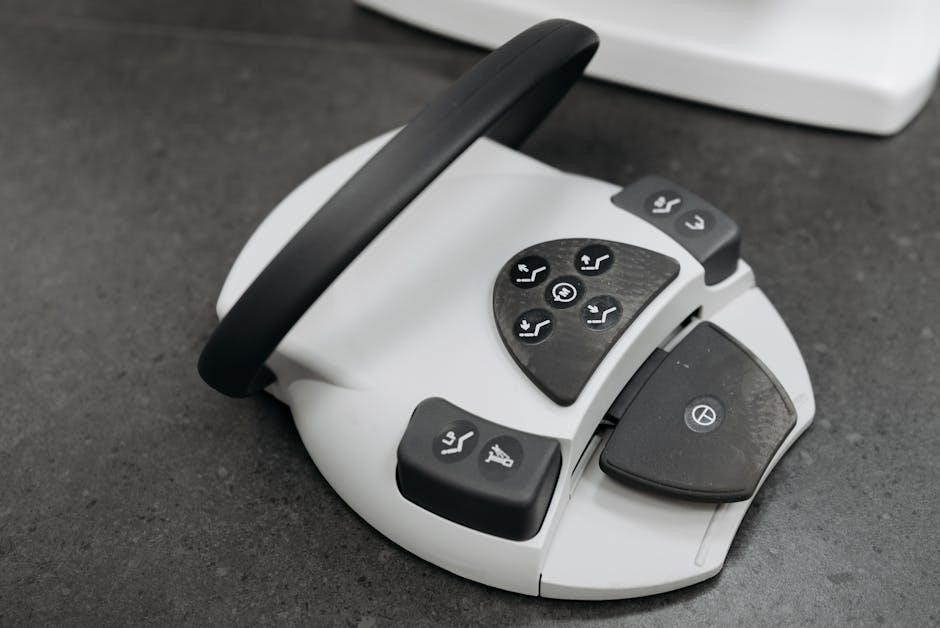
Remote Control Overview & Key Functions
The Carrier mini-split remote features a user-friendly design with dedicated buttons for essential functions. Key controls include power on/off‚ mode selection (cooling‚ heating‚ fan‚ dry‚ auto)‚ temperature adjustment‚ fan speed control‚ and swing adjustment. The timer function allows for scheduled operation‚ enhancing convenience and energy savings. Sleep mode optimizes comfort during rest.
Beyond basic controls‚ the remote enables access to advanced settings‚ such as temperature unit selection (Celsius or Fahrenheit). It also facilitates pairing with the indoor unit and‚ potentially‚ programming with a universal remote using specific Carrier codes for brands like Wellclima and Superior AirCo. Understanding each button’s purpose is vital for efficient operation and troubleshooting.
Button Identification and Descriptions
The “Power” button initiates or terminates operation. “Mode” cycles through Cooling‚ Heating‚ Fan‚ Dry‚ and Auto settings. “Temp Up/Down” adjusts the desired temperature. “Fan Speed” controls airflow intensity – Auto‚ Low‚ Medium‚ High. “Swing” directs airflow horizontally or vertically. The “Timer” button sets scheduled on/off times.
“Sleep Mode” gradually adjusts temperature for comfortable sleep. Specific buttons may activate features like “Turbo” for rapid cooling/heating. The remote’s display shows the current settings and any active error codes (like a 45 code indicating a fault). Proper use of these buttons‚ as outlined in the manual‚ ensures optimal performance and avoids signal interference. Familiarize yourself with each function for seamless control.

Initial Setup and Pairing
Begin with battery installation‚ then pair the remote to your indoor unit for seamless control. Ensure proper signal reception during this crucial setup process.
Pairing the Remote with the Indoor Unit
Successfully pairing your Carrier remote ensures reliable communication with the indoor unit. Initially‚ confirm the batteries are correctly installed with proper polarity. Power on the indoor unit; it should display a pairing indicator‚ often a flashing light. On the remote‚ press and hold the designated pairing button – consult your specific model’s diagram for location.
The indoor unit may beep or display a confirmation message upon successful pairing. If pairing fails‚ repeat the process‚ ensuring no obstructions interfere with the signal. Direct sunlight on the indoor unit’s receiver can cause interference. Maintain a reasonable distance – typically within 10 feet – during pairing. If issues persist‚ consult the troubleshooting section or contact Carrier support for assistance. A stable connection is vital for optimal operation.
Battery Installation and Replacement
Maintaining proper battery function is crucial for your Carrier remote’s operation. Typically‚ the remote requires two AAA or AA batteries – check the battery compartment for the correct size. To install‚ gently slide off the battery cover‚ observing the polarity markings (+ and -) inside the compartment. Insert the batteries accordingly. Ensure a secure fit to maintain consistent contact.
When the remote’s performance diminishes‚ or the display fades‚ replace the batteries promptly. Avoid mixing old and new batteries‚ or different battery types. Dispose of used batteries responsibly‚ following local regulations. Low battery levels can cause erratic behavior or complete failure of the remote. Regularly check battery levels to prevent interruptions in climate control.
Initial Power-On and System Check
After installing batteries and pairing the remote‚ initiate the system power-on. Direct the remote towards the indoor unit and press the power button. Observe the indoor unit for signs of activation – fan rotation and indicator lights illuminating. Verify the remote display reflects the unit’s operational status.
Perform a basic system check by selecting cooling or heating mode and adjusting the temperature. Confirm the indoor unit responds accordingly‚ initiating the chosen function. Listen for normal operating sounds; unusual noises may indicate a problem. Ensure airflow is present from the vents. If the unit fails to power on or respond‚ revisit the pairing process and battery installation. A thorough initial check ensures proper functionality.

Operating Modes Explained
Explore cooling‚ heating‚ fan‚ dry‚ and auto modes for personalized comfort! Each mode optimizes performance‚ offering tailored climate control to suit your specific needs.
Cooling Mode: Settings and Optimization
Cooling mode efficiently lowers room temperature‚ providing refreshing relief. To optimize performance‚ begin by setting your desired temperature using the remote control’s up/down arrows. Utilize the fan speed control – Auto adjusts airflow for consistent comfort‚ while Low‚ Medium‚ and High offer increasing cooling power.
The ‘Swing’ function distributes air evenly throughout the space. Experiment with different swing angles to find what best suits your room layout. For energy savings‚ consider slightly increasing the set temperature; even a degree or two can significantly reduce power consumption. Ensure filters are clean for maximum cooling efficiency. Remember‚ direct sunlight can impact cooling‚ so consider shading windows during peak hours. Properly configured‚ cooling mode delivers optimal comfort and energy efficiency.
Heating Mode: Settings and Optimization
Heating mode provides efficient and consistent warmth during colder months. Begin by setting your desired room temperature using the remote control. Similar to cooling‚ fan speed control is crucial – ‘Auto’ intelligently adjusts airflow‚ while Low‚ Medium‚ and High offer varying levels of heat output.
Utilize the ‘Swing’ function to distribute warm air evenly. Regularly cleaning the air filters is paramount for optimal heating performance and efficiency. Consider the ‘Dry’ mode beforehand to reduce humidity‚ enhancing the heating process. If your unit supports it‚ explore the ‘Turbo’ or ‘Power’ heating settings for rapid temperature increases. Remember‚ proper insulation and minimizing drafts will maximize heating effectiveness and minimize energy consumption. Optimize settings for consistent‚ comfortable warmth.
Fan Mode: Speed Control and Air Circulation
Fan mode operates independently of heating or cooling‚ solely focusing on air circulation. This is ideal for maintaining consistent temperature throughout the room or simply refreshing the air. Your remote offers multiple fan speed settings – typically Auto‚ Low‚ Medium‚ and High – allowing you to customize airflow intensity.
‘Auto’ mode intelligently adjusts fan speed based on room conditions. Utilizing fan mode can help distribute heat more evenly during winter‚ even without activating the heating function. Regularly cleaning the fan blades ensures optimal airflow and prevents dust accumulation. Some units feature a ‘Swing’ function within fan mode‚ directing airflow across a wider area. Remember‚ consistent air circulation contributes to overall comfort and can reduce stagnant air pockets.
Dry Mode (Dehumidification): How it Works
Dry mode‚ or dehumidification‚ actively reduces moisture levels in the air without significantly lowering the temperature. This is particularly useful in humid climates or damp spaces. The air conditioner operates at a lower fan speed and cycles on and off to extract moisture‚ collecting condensation which is then drained.
Unlike cooling mode‚ dry mode prioritizes humidity removal over temperature reduction‚ making it energy-efficient for damp conditions. The effectiveness of dry mode depends on the room’s humidity level and size. Ensure proper ventilation to facilitate moisture removal. Some units may not have this function if the outdoor unit doesn’t support it. Regularly check the drain line to prevent clogs and ensure efficient operation.
Auto Mode: Intelligent Climate Control
Auto mode offers a convenient‚ hands-free operation by automatically adjusting cooling and heating based on the room’s temperature. The Carrier mini-split intelligently selects the appropriate mode – cooling‚ heating‚ or fan – to maintain your desired setpoint. It continuously monitors the room temperature and adjusts the fan speed and compressor output for optimal comfort and energy efficiency.

This mode is ideal for situations where consistent temperature is desired without manual adjustments. The system determines the most efficient way to reach and maintain the set temperature. While convenient‚ auto mode may not be suitable for all preferences‚ as it prioritizes efficiency over precise temperature control. It’s a smart solution for effortless climate management.

Advanced Features & Settings
Explore timer functions‚ sleep mode for restful nights‚ swing adjustments for airflow‚ and temperature unit selection (Celsius or Fahrenheit) for personalized comfort.
Timer Function: Setting Schedules
The timer function allows you to pre-program your Carrier mini-split to automatically turn on or off at specific times‚ enhancing convenience and energy efficiency. To set a timer‚ locate the “Timer” button on your remote control. Pressing this button will typically initiate a timer setting mode.
You’ll then be prompted to set the desired on/off time using the number pad. Some models allow for multiple timer settings throughout the day. Carefully review your remote’s display to confirm the correct time and settings. Ensure the clock on your unit is accurately set for precise scheduling. This feature is invaluable for pre-cooling or pre-heating your space before you arrive home‚ or for automatically turning off the unit during periods of inactivity‚ saving energy and reducing costs.
Sleep Mode: Comfort During Rest
Carrier’s Sleep Mode is designed to provide a comfortable and energy-efficient sleeping environment. When activated‚ this mode gradually adjusts the temperature throughout the night‚ typically increasing it in cooling mode or decreasing it in heating mode‚ to prevent discomfort and conserve energy.
To engage Sleep Mode‚ press the designated “Sleep” button on your remote control. The unit will then enter a pre-programmed temperature adjustment schedule. The rate of temperature change is often subtle‚ ensuring a peaceful sleep. Some models allow you to customize the sleep mode settings‚ such as the number of hours before the unit returns to the previously set temperature. This feature is ideal for maintaining a comfortable temperature while you sleep without manually adjusting the thermostat throughout the night.
Swing Function: Adjusting Airflow Direction
Carrier mini-split systems offer a Swing function to optimize air distribution within a room. This feature allows you to control the vertical and/or horizontal airflow direction‚ ensuring even cooling or heating. By pressing the “Swing” button on your remote‚ you can typically cycle through various settings.
These settings often include automatic swing (where the louvers move up and down or side to side)‚ fixed position (allowing you to manually set the louver angle)‚ and swing off (locking the louvers in a specific position). Utilizing the swing function prevents concentrated airflow‚ eliminating cold or hot spots and enhancing overall comfort. Proper adjustment ensures air reaches all areas of the room‚ maximizing the efficiency of your Carrier mini-split system.
Temperature Units: Celsius vs. Fahrenheit
Carrier mini-split remote controls provide the flexibility to display temperatures in either Celsius (°C) or Fahrenheit (°F). This setting caters to user preference and regional standards. To switch between units‚ locate the dedicated “°C/°F” button on your remote control – its exact location may vary depending on the remote model.
Pressing this button toggles the display between the two scales. Understanding this function is crucial for accurately setting your desired room temperature. Remember that 0°C is equivalent to 32°F‚ and a change of 1°C corresponds to a change of 1.8°F. Ensure the correct unit is selected for precise temperature control and optimal comfort. This simple adjustment allows you to personalize your Carrier mini-split experience.

Troubleshooting Common Issues
Resolve typical problems like unresponsive remotes‚ units failing to power on‚ or error codes (such as 45)‚ and address potential signal interference quickly.
Remote Control Not Responding
If your Carrier mini-split remote isn’t responding‚ begin with the simplest checks. First‚ ensure fresh batteries are correctly installed‚ observing proper polarity. Weak batteries are a frequent cause of signal failure. Next‚ verify there’s a clear line of sight between the remote and the indoor unit’s receiver; obstructions can block the infrared signal.
Avoid direct sunlight hitting the receiver‚ as this can cause interference. Try resetting the remote by removing and reinserting the batteries. If the issue persists‚ gently clean the remote’s signal emitter and the indoor unit’s receiver with a soft‚ dry cloth. Confirm the remote isn’t accidentally set to a mode that disables operation. Finally‚ consider potential interference from other electronic devices nearby.
Air Conditioner Not Turning On
When your Carrier mini-split fails to power on‚ systematically check potential causes. First‚ confirm the unit is properly plugged into a functioning power outlet. Verify the circuit breaker hasn’t tripped; reset it if necessary. Ensure the remote control has functional batteries and is correctly paired with the indoor unit. Attempt to power on the unit directly from the indoor unit’s emergency on/off switch (if equipped)‚ bypassing the remote.
If it still doesn’t start‚ an error code might be displayed – consult the troubleshooting section for interpretation. Check for any flashing lights on the indoor or outdoor unit‚ indicating a potential fault. A tripped safety switch or a communication error between the indoor and outdoor units could also be the issue. If problems persist‚ contact a qualified technician.
Error Codes and Their Meanings (e.g.‚ 45 code)
Carrier mini-split systems utilize error codes to diagnose issues. A common code‚ 45‚ often indicates a fault within the outdoor unit’s inverter or compressor system‚ requiring professional attention. Other codes signal different problems; for example‚ codes related to sensor malfunctions‚ fan motor errors‚ or refrigerant leaks. Refer to your specific model’s service manual for a complete list and detailed explanations.
To identify the error code‚ observe the display panel on the indoor unit. Some models may require pressing a specific button combination to view the code. Document the code accurately before contacting support or a technician. Attempting to resolve complex error codes without proper training can cause further damage. Always prioritize safety and professional assistance.
Signal Interference and Solutions
Carrier mini-split remote controls rely on infrared (IR) signals. Interference can occur from direct sunlight‚ fluorescent lights‚ or other IR-emitting devices. Ensure a clear line of sight between the remote and the indoor unit’s receiver. Avoid obstructions and reposition light sources if necessary. The receiver’s performance can be compromised by direct sunlight‚ hindering signal reception and impacting air conditioner functionality.
If interference persists‚ try replacing the remote’s batteries. Weak batteries reduce signal strength. Also‚ verify the indoor unit’s receiver isn’t obstructed by dust or debris. Regularly cleaning the receiver area can improve signal quality. If problems continue‚ consider relocating the indoor unit slightly to minimize external interference sources.

Carrier Remote Codes for Universal Remotes
Unlock compatibility! Find 3-digit Carrier codes for brands like Wellclima and Superior AirCo to program your universal remote for seamless control.
Carrier 3-Digit Codes for Various Brands (Wellclima‚ Superior AirCo)
Programming your universal remote to control your Carrier mini-split often requires a specific 3-digit code. These codes allow seamless communication between the universal remote and your air conditioning unit. For Wellclima Smart remotes‚ several codes may work‚ including 0234‚ 0374‚ 0375‚ 0654‚ 1399‚ and 1910. Superior AirCo remotes may utilize different codes; experimentation might be necessary.
It’s important to note that code availability can vary depending on the specific model of both the Carrier unit and the universal remote. If the initial code doesn’t work‚ systematically try other options from the list. Remember to consult your universal remote’s manual for specific programming instructions. Successful programming ensures convenient control of your Carrier system without the original remote.
Finding the Correct Code for Your Universal Remote
Locating the correct code for your Carrier mini-split and universal remote can sometimes be a process of trial and error. Begin by consulting the code list included with your universal remote; many manufacturers provide extensive databases categorized by brand. If your remote lacks a Carrier-specific listing‚ explore online code databases – numerous websites compile remote codes for various devices.
Alternatively‚ utilize the auto-search function available on many universal remotes. This feature systematically cycles through codes until your Carrier unit responds. Remember to point the remote directly at the indoor unit during the search. Patience is key‚ as this process can take time. Once a code is found‚ test all functions to ensure full compatibility before finalizing the programming.
Programming a Universal Remote to Control Your Carrier Unit
To program your universal remote‚ first‚ ensure it’s in programming mode – consult your remote’s manual for specific instructions. Typically‚ this involves pressing and holding a “Setup” or “Magic” button. Next‚ enter the 3-digit code for Carrier (or a listed compatible brand like Wellclima or Superior AirCo) found in the remote’s code list or online databases.
After entering the code‚ the remote should attempt to communicate with your Carrier mini-split. If successful‚ test essential functions like power‚ temperature adjustment‚ and mode selection. If the remote doesn’t respond‚ repeat the process with alternative Carrier codes or utilize the auto-search function. Confirm full functionality before relying on the programmed remote.
Maintenance and Care
Protect your remote from damage and direct sunlight for optimal signal transmission. Regularly clean it with a soft cloth to ensure reliable operation.
Cleaning the Remote Control

Maintaining a clean remote control is crucial for its longevity and proper function. Before cleaning‚ always remove the batteries to prevent accidental operation and potential damage. Use a soft‚ dry cloth to wipe away dust and dirt from the surface. Avoid using abrasive cleaners‚ solvents‚ or excessive moisture‚ as these can harm the buttons and internal components.

For stubborn grime‚ lightly dampen the cloth with water‚ ensuring it’s not dripping wet. Gently wipe the affected areas‚ then immediately dry with a clean‚ dry cloth. Pay particular attention to the areas around the buttons‚ where dirt tends to accumulate. Do not disassemble the remote control for cleaning‚ as this could void the warranty and potentially damage the delicate electronics inside. Regular cleaning will ensure reliable signal transmission and extend the life of your Carrier remote.
Protecting the Remote from Damage
Safeguarding your Carrier mini-split remote control from physical damage is essential for uninterrupted operation. Avoid dropping the remote‚ as internal components are sensitive to impact. Keep it away from direct sunlight‚ which can degrade the plastic casing and affect the LCD display. Also‚ prevent exposure to extreme temperatures or humidity‚ as these conditions can cause malfunctions.
Store the remote in a safe‚ dry location when not in use‚ such as a drawer or on a stable surface. Avoid placing heavy objects on top of it. Be mindful of potential signal interference; keep the remote away from devices that emit strong electromagnetic fields. Regularly check the battery compartment for corrosion and replace batteries promptly to prevent leakage. Proper care will ensure your remote remains a reliable tool for controlling your Carrier system.
Indoor Unit Receiver and Signal Interference
Optimal signal transmission between your remote and the Carrier mini-split’s indoor unit is crucial for seamless control. The indoor unit houses a receiver sensitive to obstructions and interference. Avoid placing objects directly in front of the receiver‚ as this can weaken the signal. Be aware that certain electronic devices – like fluorescent lights‚ microwaves‚ and wireless routers – can generate electromagnetic waves that disrupt communication.
Direct sunlight on the receiver can also cause interference‚ hindering proper operation. Ensure the receiver has a clear line of sight to the remote. If you experience signal issues‚ try relocating the indoor unit or the interfering device. Regularly check for obstructions and maintain a clean environment around the receiver to maximize signal strength and ensure reliable control of your Carrier system.